


Copyright Wudi Zhibo Metals Co., LTD
Contact us
Tel:+86-0543-6288039/+86-0543-5076388
Fax:+86-0543-5076399
E-Mail:zhibometal@zbhardware.com
© ALL COPYRIGHT
Copyright Wudi Zhibo Metals Co., LTD
Powered by www.300.cn


Your current location:
How to Install Shade Sails
Shade sails take you one step closer to creating the perfect backyard getaway, but you may be worried about the technical aspects of bringing your dream to life. Installing them may seem intimidating, but you can complete the installation yourself with time and basic power tool knowledge. This DIY approach will also help you save on additional professional installation costs.
We created a brief how-to guide for installing your shade sail that comes with a few tips and tricks you may not have considered to get you on the right path. Remember that there are various ways to hang your shade sail based on the location and size, offering excellent installation flexibility and making it easier for you to choose the methods that are the best fit for you.
Preparing to Hang Your Shade Sail
Building Approval
Before we get to the fun part of digging and drilling holes, you must follow a few preparation steps. Those who live in a neighborhood with a Home Owners Association need to follow neighborhood guidelines regarding height, color, and placement. Failing to do so can lead to fines and possibly the removal of an already installed shade sail. Your hard work going to waste is undoubtedly disappointing, so be proactive in checking that your shade sail does not violate any restrictions.
Attachment Points
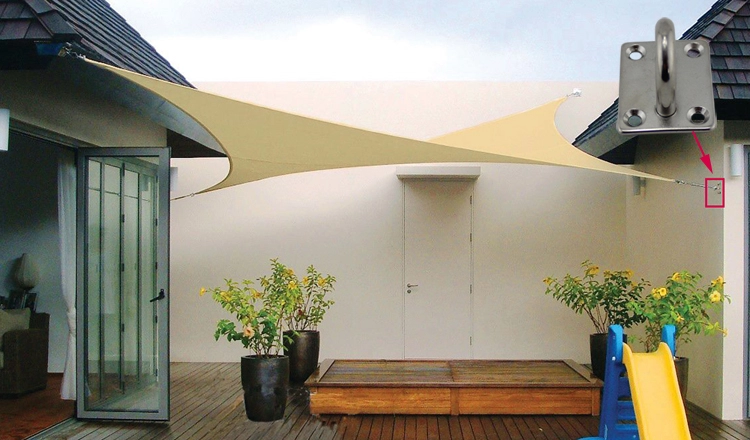
You probably have a vision about the area you would like your shade sail to cover, but you will also need to account for the location of the best attachment points for your shade sail. Identify sturdy structures that are within a reasonable distance as your attachment points. One of them will likely be your home, but you can also install in-ground posts for more remote areas. Ensure that all your fixing points utilize studs or rafters. Mark the location of the attachment points on your home and posts with a marker, pencil, or chalk.
Tools & Hardware
As we mentioned, there are many ways to hang a shade sail, resulting in a range of tools and hardware depending on the method you choose. You can review our list below for the most common tools and hardware pieces.
- Impact drill
- Screws & anchors
- Turnbuckles
- Drill bits
- Rope or chain
- Ladder
- Snap hooks
- Pad eyes
*If you are missing any needed tools, you can rent them from most large hardware stores.
An easy way to save time and money is to purchase your hardware in kits, no need to scour the home improvement store for every piece.

Shade Sail Installation Guide
Step One
Lay your shade sail flat on the ground. Identify the top and bottom.
Step Two
Attach each pad eye using appropriate screws and anchors as needed. Verify each one is level and secure before moving on to the next. Note: We recommend installing the pad eyes at a pitch to promote water runoff.
Step Three
Now it's time to start installing your shade sail, one corner at a time. Start by attaching your snap hook to the first corner, followed by a turnbuckle attached to your first pad eye. Note: You will want your turnbuckle fully extended in each corner.
Step Four
As you install each corner, you may notice it becomes increasingly more challenging to attach; this is entirely normal. Shade sails must be very taut to avoid damage during high winds and inclement weather. You may need to run a rope through the sails corner hardware and the pad eye to help you pull the sail into position. Note: If the shade sail doesn't reach each pad eye, you may need to implement chain links or steel cable to make up the difference where needed.
Step Five
Once each corner is securely attached, you will need to tighten each turnbuckle a few turns at a time to get even tension all around the shade sail. Once the tensioning is complete, the shade sail should have little to no wrinkles in the fabric and should not sag in the middle.
Your last step is to enjoy your backyard getaway! After all your hard work and the time you invested, you should feel accomplished. Now you can bask in the cool shade.

